Showing posts with label Programming. Show all posts

Tuesday, June 30, 2020

Android Smartphone as PC monitor

This URL is some guides for it.

techwiser.com

The following software is awsome

Wednesday, March 18, 2020

Python Script to Fetch Webpage Source

# save-webpage.py

import urllib2

for i in range(4,20):
url = 'https://namaanakperempuan.net/nama-bayi-perempuan-jawa-dan-artinya/%d/'%(i)

response = urllib2.urlopen(url)
webContent = response.read()

f = open('bayi%d.html'%(i), 'w')
f.write(webContent)
f.close


Wednesday, April 18, 2018

Atmel Studio 7 Set-up for Arduino UNO Programming

Abstract: Arduino Uno is one of the most used boards by beginners to learn embedded systems. The easiest way to program Arduino Uno is to write code in the sketch programming language using the default Arduino software (Arduino IDE). The Arduino IDE interface is very simple and writing programs in sketch is very easy. This is both an advantage and a weakness of programming with the Arduino IDE, where someone who wants to learn more about the microcontroller system will experience difficulties because they cannot see how the processor works more transparently. There are several alternatives to the Arduino IDE for programming in assembly and C / C ++, one of which is Atmel Studio 7.In this paper, I will explain how to set the environment for Arduino Uno programming using Atmel Studio 7 software.

Abstrak: Arduino Uno merupakan salah satu board yang paling banyak digunakan oleh pemula untuk mempelajari sistem embedded. Cara termudah untuk memprogram Arduino Uno adalah dengan menulis code dalam bahasa pemrograman sketch menggunakan software bawaan dari Arduino (Arduino IDE). Interface Arduino IDE sangat sederhana dan menulis program dalam sketch-pun sangat mudah. Hal ini merupakan kelebihan sekaligus kelemahan pemrograman dengan Arduino IDE, dimana seseorang yang ingin mempelajari sistem mikrokontroller lebih mendalam, akan mengalami kesulitan karena tidak dapat melihat cara kerja prosesor secara lebih transparan. Ada beberapa alternatif dari Arduino IDE untuk pemrograman dalam assembly maupun C/C++, salah satunya adalah Atmel Studio 7. Pada tulisan ini, saya akan menjelaskan cara setting environment untuk pemrograman Arduino Uno dengan menggunakan software Atmel Studio 7.

Sunday, April 15, 2018

Arduino UNO /AVR 328P Serial USART Transmission in Assembly


;
; Serial USART.asm
;
; Created: 4/15/2018 9:24:49 PM
;

.equ    UBRRNX0=103    ; 9600bps
.equ    UBRRNX1=207

// start code
start:
    rcall    USART_Init
    ; write your code here
    ldi        r16,0x24
    rcall USART_Transmit   

end:
    rjmp    end

; end of your code
; this is my part
;----------
USART_Init:
    push r16
    push r17
       
    ldi r16, low(UBRRNX0)            ; Set baud rate to UBRR0
    ldi r17, high(UBRRNX0)
    sts UBRR0H, r17
    sts UBRR0L, r16
       
    ldi r16, (1
<<RXEN0)|(1<<TXEN0)    ; Enable receiver and transmitter
    sts UCSR0B,r16
       
    ldi r16, (1
<<USBS0)|(3<<UCSZ00)    ; Set frame format: 8data, 2stop bit
    sts UCSR0C,r16
    pop r17
    pop r16
    ret

USART_Transmit:
    push r17
    lds r17, UCSR0A                    ; Wait for empty transmit buffer
    sbrs r17, UDRE0
    rjmp USART_Transmit
       
    sts UDR0,r16                    ; Put data (r16) into buffer, sends the data
    pop r17
    ret

Sunday, April 8, 2018

Arduino UNO Blinking with Timer on Assembly


.equ    DELOOP=10
.MACRO  CPL                    ; Macro to complemen pin
    sbi    0x1E,    @1            ; use this register to xor the pin
    in    r17,    0x1E
    in    r16,    @0        
    eor r16,    r17        
    out @0,        r16
.ENDMACRO

.ORG 0x0000                    ; The beginning of everything
    rjmp START                ; the reset vector: jump to "main"

.ORG 0x0020                    ; interrupt vector: timer0 overflow
    rjmp timer0_overflow    ; jump to interrupt handler

.ORG 0x0034                    ; memory address start of "main function"
START:
    ldi r22,    DELOOP                ; initial value for timer looping

    ldi r16,    0xFF         
    out DDRB,    r16            ; set Port B as output

    ldi r16,    0x0000   
    out TCCR0A, r16            ; timer 0 run in normal mode
    ldi r16,    0x0001   
    sts TIMSK0,    r16
    ldi r16,    0b00000101        ; Set r16 with prescaler 1024 value
    out TCCR0B, r16            ; Set the TCCROB to 1024
    SEI                        ; enable global interrupt

LOOP:
    rjmp LOOP            ; jump to loop

timer0_overflow:
    dec        r22
    breq    toggle
    reti

toggle:                    ; the subroutine:
    ldi        r22, DELOOP
    CPL        PortB, 5            ; toggle the LED
    reti


Load programs to an Arduino UNO from Atmel Studio 7

Many tools can be used, but I like mostly Arduino Sketch Uploader


ArduinoSketchUploader
arduino-uno-from-atmel-studio-7
other
other

Saturday, April 7, 2018

Reset MySQL Root Password

-----
Basic step to reset mysqld password just follow these instructions :
  • Stop the mysql demon process
    •    sudo /etc/init.d/mysql stop
  • Start the mysqld demon process using the --skip-grant-tables option
    •    sudo /usr/sbin/mysqld --skip-grant-tables --skip-networking &
      or
         sudo mysqld_safe --skip-grant-tables &
       
  • start the mysql client process using this command
    •    mysql -u root
  • from the mysql prompt execute this command to be able to change any password
    •    FLUSH PRIVILEGES;
  • Then reset/update your password
    •    SET PASSWORD FOR root@'localhost' = PASSWORD('password');
  • If you have a mysql root account that can connect from everywhere, you should also do:
    •    UPDATE mysql.user SET Password=PASSWORD('newpwd') WHERE User='root';
  • Alternate Method:
    •    USE mysql
         UPDATE user SET Password = PASSWORD('newpwd')
         WHERE Host = 'localhost' AND User = 'root';
  • And if you have a root account that can access from everywhere:
    •    USE mysql
         UPDATE user SET Password = PASSWORD('newpwd')
         WHERE Host = '%' AND User = 'root';
For either method, once have received a message indicating a successful query (one or more rows affected), flush privileges:
   FLUSH PRIVILEGES;

Then stop the mysqld process and relaunch it
   sudo /etc/init.d/mysql stop
   sudo /etc/init.d/mysql start
 

-- Alternative method for different source
 
1. Run bash commands
 

# 1. first, run these bash commands
sudo /etc/init.d/mysql stop # stop mysql service
sudo mysqld_safe --skip-grant-tables & # start mysql without password
# enter -> go
mysql -uroot # connect to mysql

2. Run mysql commands

use mysql; # use mysql table
update user set authentication_string=PASSWORD("") where User='root'; # update password to nothing
update user set plugin="mysql_native_password" where User='root'; # set password resolving to default mechanism for root user

flush privileges;
quit;

3. Run more bash commands

sudo /etc/init.d/mysql stop 
sudo /etc/init.d/mysql start # reset mysql 
mysql -u root -p root # try login to database


-- If you find following error

2017-02-10T17:05:44.870970Z mysqld_safe Logging to '/var/log/mysql/error.log'.
2017-02-10T17:05:44.872874Z mysqld_safe Logging to '/var/log/mysql/error.log'.
2017-02-10T17:05:44.874547Z mysqld_safe Directory '/var/run/mysqld' for UNIX socket file don't exists. 
 
Do this 
$ mkdir -p /var/run/mysqld
$ chown mysql:mysql /var/run/mysqld

To reset 
Mysqld_safe 
Solving Error 
 

Thursday, April 5, 2018

Setup PHP on Ubuntu

Please check these links

LAMP
LAMP how to

To install PHP 7 on Ubuntu 
sudo apt-get -y update
sudo add-apt-repository ppa:ondrej/php
sudo apt-get -y update
sudo apt-get install -y php7.0 libapache2-mod-php7.0 php7.0 php7.0-common php7.0-gd php7.0-mysql php7.0-mcrypt php7.0-curl php7.0-intl php7.0-xsl php7.0-mbstring php7.0-zip php7.0-bcmath php7.0-iconv php7.0-soap


PHP install guide

to Upgrade to PHP7
PHP7

 If an "PHP ERROR: Module php7.0 does not exist" occur

PHP ERROR

to install PHPmyAdmin

sudo apt-get install phpmyadmin
phpMyAdmin

Tuesday, April 3, 2018

Adaptive Runge Kutta to Solve ODE

This is a paperwork of my student. You can refer to this.

Download paper

Sunday, April 1, 2018

Blinking Arduino Uno with Assembly


.ORG 0x0000            ; the next instruction has to be written to
                       ; address 0x0000
rjmp START             ; the reset vector: jump to "main"
START:
    ldi r16, low(RAMEND)   ; set up the stack
    out SPL, r16
    ldi r16, high(RAMEND)
    out SPH, r16
    ldi r16, 0xFF          ; load register 16 with 0xFF (all bits 1)
    out DDRB, r16          ; write the value in r16 (0xFF) to Data
                       ; Direction Register B
LOOP:
    sbi PortB, 5         ; switch off the LED
    rcall delay_05       ; wait for half a second
    cbi PortB, 5         ; switch it on
    rcall delay_05       ; wait for half a secon
    rjmp LOOP            ; jump to loop

DELAY_05:              ; the subroutine:
    ldi r16, 31          ; load r16 with 31

OUTER_LOOP:            ; outer loop label
    ldi r24, low(1021)   ; load registers r24:r25 with 1021, our new
                        ; init value
    ldi r25, high(1021)  ; the loop label
DELAY_LOOP:            ; "add immediate to word": r24:r25 are
                       ; incremented
    adiw r24, 1          ; if no overflow ("branch if not equal"), go
                        ; back to "delay_loop"
    brne DELAY_LOOP
    dec r16              ; decrement r16
    brne OUTER_LOOP      ; and loop if outer loop not finished
    ret                  ; return from subroutine


Ref:
ref1
ref2

Sunday, March 11, 2018

Friday, January 3, 2014

Passing two dimensional array

#include
#include

foo(char in[][10]){
char *a = "Hello";
char *b = "Helle";

memcpy(in[0],a,strlen(a)+1);
memcpy(in[1],b,strlen(b)+1);
}


int main(int argc, char *argv[]){
char var[2][10];

  foo(var);
  printf("out: %s %s \n", var[0], var[1]);
 
    return(0);
}

Thursday, November 28, 2013

NTP Client

Linux version

#include <sys/socket.h>
#include <sys/types.h>
#include <netinet/in.h>
#include <netdb.h>
#include <stdio.h>
#include <string.h>
#include <stdlib.h>
#include <unistd.h>
#include <errno.h>
#include <arpa/inet.h >

int main(void)
{
    int sockfd = 0, n = 0, ii = 1;
    char recvBuff[1024];
    struct sockaddr_in serv_addr; 
    setvbuf(stdout, NULL, _IONBF, 0);
printf("Retrieving time, please wait ");
    memset(recvBuff, '0',sizeof(recvBuff));
    n=-1;

    while(n<=0)
    {
//    printf("====== attempt %d \n\n", ii);
    printf(".");
    
    if (ii == 50)
    {
   printf("\n");
   ii =0;
   }
    
    if((sockfd = socket(AF_INET, SOCK_STREAM, 0)) < 0)
    {
        printf("\n Error : Could not create socket \n");
        return 1;
    } 

    serv_addr.sin_addr.s_addr = inet_addr("64.90.182.55");
//     serv_addr.sin_addr.s_addr = inet_addr("96.47.67.105");
    serv_addr.sin_family = AF_INET;
    serv_addr.sin_port = htons(13); 

       if( connect(sockfd, (struct sockaddr *)&serv_addr, sizeof(serv_addr)) < 0)
       {
          printf("\n Error : Connect Failed \n");
          return 1;
       } 

       n = read(sockfd, recvBuff, sizeof(recvBuff)-1);
       close(sockfd);
       usleep(10000);
       ii++;
    }
      recvBuff[n] = 0;
      printf("%s\n",recvBuff);

    return 0;
}

Windows version

//============================================================================
// Name        : windows_time_client.cpp
// Author      : Norma Hermawan
// Version     :
// Copyright   : Your copyright notice
// Description : CONNECT TO REMOTE HOST (CLIENT APPLICATION)
//               Include the needed header files.
//               Don’t forget to link libws2_32.a to your program as well
//               2. To set the library
//               Bring up the properties box for the project.
//               Select all configurations.
//               In the linker section on the left handside - select Input and in the right hand side add
//               ws2_32.lib in the Additional Dependencies box

//============================================================================

#include "stdafx.h"
#include <winsock.h>
#include <iostream>

using namespace std;
#define TIMESERV_PORT  13
//#define TIMESERV_IP    "96.47.67.105" // this is time server IP
#define TIMESERV_IP    "64.90.182.55" // this is time server IP
//#define TIMESERV_IP    "128.138.188.172" // this is time server IP
//#define TIMESERV_IP    "211.233.40.78" // this is time server IP
//#define TIMESERV_IP    "203.160.128.178" // this is time server IP
//#define TIMESERV_IP    "113.20.31.30" // this is time server IP

int main() {
SOCKET sfd; //Socket handle
char buffer[80];
int n, ii =1;
time_t prev_stamp;

printf("Retrieving time, please wait ",ii);
do{
//    system ("ping 64.90.182.55");
//Start up Winsock…
// printf("Starting winsock ============================= attempt %d\n\n",ii);
// printf("Retrieving time, attempt %d\n\n",ii);
printf(".");
if (ii==50){
      printf("\n");
      ii = 0;
            }
WSADATA wsadata;

int error = WSAStartup(0x0202, &wsadata);

//Fill out the information needed to initialize a socket…
SOCKADDR_IN addr; //Socket address information

addr.sin_family = AF_INET; // address family Internet
addr.sin_port = htons (TIMESERV_PORT); //Port to connect on
addr.sin_addr.s_addr = inet_addr (TIMESERV_IP); //Target IP

// printf("Create socket\n");
sfd = socket (AF_INET, SOCK_STREAM, IPPROTO_TCP); //Create socket
// printf("Establishing Connection \n");
    int res = connect(sfd, (sockaddr*) &addr, sizeof(addr));
//    printf("Connectition is established \n");
memset(buffer, 0, sizeof(buffer)); //Clear the buffer
// printf("Receiving signal \n\n");
prev_stamp = time(NULL);
//Put the incoming text into our buffer
n = recv (sfd, buffer, sizeof(buffer)-1, 0);//) <= 0) &&((time(NULL) - prev_stamp) < 5))
    
closesocket(sfd);
WSACleanup(); //Clean up Winsock
// Sleep(10);
ii++;
}
while(n<=0);
printf("\nTime: ", n);
buffer[n] = 0;
printf("%s\n",buffer);

system("Pause");
return 0;
}

Tuesday, November 26, 2013

Time Slice Multitasking

This is a code example of time slice multitasking in C.

#include
#define KERNEL_SLEEP_US 1000
#define msleep(x) sleepc++; if(sleepc != x){return;}else{sleepc=0;}
int program_end = 0;

void task1(void) {
static int pc=0,sleepc=0;
switch (pc){
case 0: goto label0;
case 1: goto label1;
case 2: goto label2;
case 3: goto label3;
case 4: goto label4;
case 5: goto label5;
case 6: goto label6;
case 7: goto label7;
default: return;
}                                   // task code section
                                       // ========================================= 
label0:               /* a task code -> */ while(1){
pc=1; return; label1: /* a task code -> */   
pc=2; return; label2: /* a task code -> */   
pc=3; return; label3: /* a task code -> */   
pc=4; return; label4: /* a task code -> */   
pc=5; return; label5: /* a task code -> */   printf("Hello from task 1\n");
pc=6; return; label6: /* a task code -> */   msleep(250);  }
pc=7; return; label7: /* a task code -> */   
pc=8; return;                           // ========================================      
}

void task2(void) {
static int pc=0,sleepc=0,ii;
switch (pc){
case 0: goto label0;
case 1: goto label1;
case 2: goto label2;
case 3: goto label3;
case 4: goto label4;
case 5: goto label5;
case 6: goto label6;
case 7: goto label7;
default: return;
}                                   // task code section
                                       // ========================================= 
label0:               /* a task code -> */   for(ii=0;ii<5 font="" ii="">
pc=1; return; label1: /* a task code -> */     printf("<<-- --="" 2="" d="" font="" ii="" n="" task="">
pc=2; return; label2: /* a task code -> */     msleep(1000); };
pc=3; return; label3: /* a task code -> */   
pc=4; return; label4: /* a task code -> */   program_end = 1;
pc=5; return; label5: /* a task code -> */   
pc=6; return; label6: /* a task code -> */   
pc=7; return; label7: /* a task code -> */   
pc=8; return;                           // =========================================        
}

my_kernel(){
  usleep(KERNEL_SLEEP_US); // sleep 100 ms
}

int main(void)
{
  while(!program_end)
  {
  task1();
  task2();
  my_kernel();
  }
    return 0;
}

Monday, July 29, 2013

Sudoku Solver


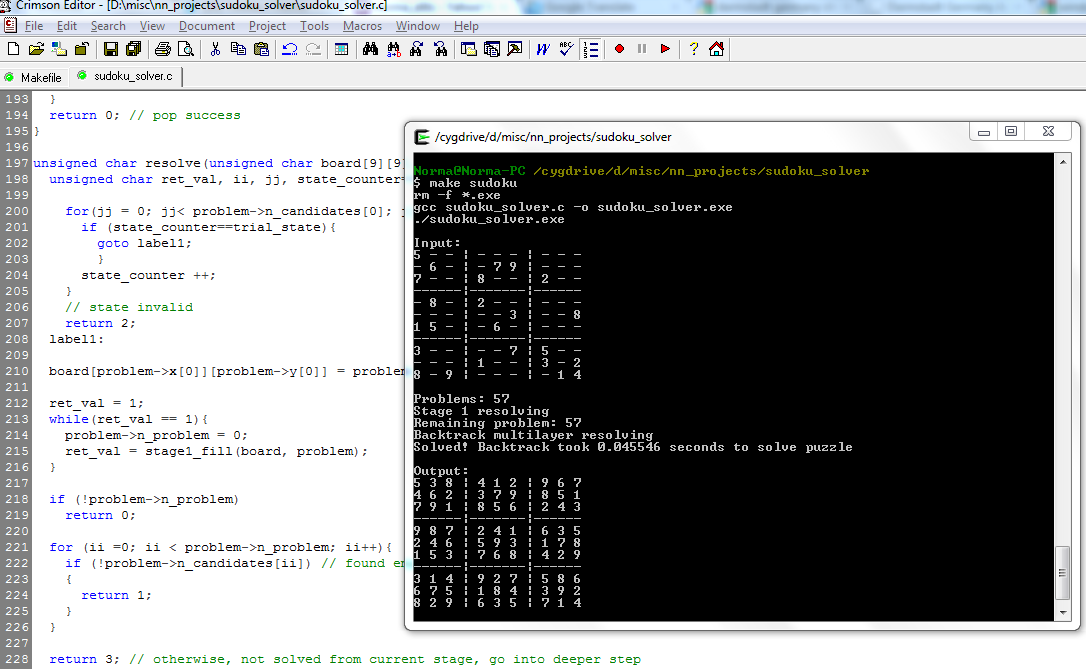
Sudoku is one of my favorite games. I used to play it a lot. One day, I meet a difficult sudoku problem that I can't solve easily, that simply perturb my mind. Rather than solving the problem, I prefer to make a solver code. I knew there are a lot of sudoku solver out there. But dude, that is the game. Creating a solver is the game itself, at least for me.
Then I did a little research. Wikipedia is always a good introductory. There are at least three methods to implement the solver:
1. Unique / Coloring / Possible Value
2. Booked Space
3. Back Track / Brute Force / Fill Empty Space

the last one is the most simple method for a practically infinite computation resource.
Ok. The solver is implemented and well tested. The screenshot shows a preview of mine.

Bellow is the C source code
link


Wednesday, May 30, 2012

VHDL port Array


the solution is to declare
Data Types 33
TLFeBOOK
user-defined data types in a PACKAGE, which will then be visible to the whole design
(thus including the ENTITY). An example is shown below.

------- Package: --------------------------
LIBRARY ieee;
USE ieee.std_logic_1164.all;
----------------------------
PACKAGE my_data_types IS
TYPE vector_array IS ARRAY (NATURAL RANGE <>) OF
STD_LOGIC_VECTOR(7 DOWNTO 0);
END my_data_types;
--------------------------------------------

Source: Circuit Design with VHDL, Volnei A. Pedroni
MIT Press


Monday, May 28, 2012

Modify VHDL Assertion Message


The clew is to edit modelsim.ini in modelsim installation folder refer to ModelSim User's Manual in the chapter explaining "modelsim.ini Variables" -> BreakOnAssertion.

Have Fun! ;)

Sunday, January 1, 2012

Trim function for std::string

This is a simple and efficient function to trim a string class in C++

void trim(string& astring, const char t){
   string::iterator it;
   
   for (it=astring.begin() ; it < astring.end(); it++){
      if(*it==t){
           astring.erase(it);
       };
   }
}

usage example

trim (number, ' ');

I think it is quite clear.

Tuesday, December 27, 2011

Learning C++

This is my useful website recommendation to study C++. It gives very clear explanation and complete example. You can also download the pdf. What a very great tutorial :)

http://www.cplusplus.com/doc/tutorial/

Monday, December 19, 2011

SystemC


You can get the tutorial from the link below.
Source:
http://www.asic-world.com/systemc/index.html

You can get the Library Installer from  http://www.accellera.org/downloads/standards/systemc

This is how to install systemC library in Ubuntu

:~$ wget http://www.pfb.no/files/systemc-2.2.0-ubuntu10.10.patch
:~$ tar -xvzf systemc-2.2.0.tgz
:~$ cd systemc-2.2.0
:~$ patch -p1 < ../systemc-2.2.0-ubuntu10.10.patch
:~$ sudo mkdir /usr/local/systemc-2.2
:~$ mkdir objdir
:~$ cd objdir
:~$ sudo ../configure --prefix=/usr/local/systemc-2.2
:~$ make
:~$ sudo make install

Don't forget to add this line to your startup file

:~$export SYSTEMC_HOME=/usr/local/systemc-2.2/

and to compile:

:~$g++ -I. -I$SYSTEMC_HOME/include -L. -L$SYSTEMC_HOME/lib-linux -o OUTFILE INPUT.cpp -lsystemc -lm
 

Source:
http://archive.pfb.no/2010/10/13/systemc-ubuntu-1010/
http://ubuntuforums.org/showthread.php?t=1257173

If you get Error like this
reference 'm_obj' cannot be declared 'mutable' [-fpermissive]

you can simply remove the "mutable" keyword in
the SystemC sources (and installed headers) at the reported places.

Source:
http://www.accellera.org/Discussion_Forums/systemc-forum/archive/msg?list_name=systemc-forum&monthdir=201105&msg=msg00017.html